One of the aspects of K-beauty that I think gets undeservedly overlooked is hair care. My experience with Korean hair care has been generally very positive—which makes perfect sense. If Korean skin care has helped to make my skin healthier and glowier, why wouldn’t the same brands be able to make my scalp feel good and help my hair shine?
This is a look at my weekend hair care routine, which is a bit more complex than my daily care, but I think that the pampering treatments I give my hair on the weekend really set my scalp and strands up for success.
Scalp shampoo or scaler

Innisfree Green Tea Mint Fresh Scalp Scaler, a new addition to my testing library.
Yup, you heard it right. I use a special scalp treatment once per week. There’s literally special stuff to clean scalps. I didn’t know this until I started getting interested in hair care!
One of the greatest mysteries I encountered as a fan of Korean hair care was the statement on Skylake’s shampoo that it keeps hair black. Many other people who encountered the shampoo also wondered the same thing: Is it safe for light hair colors? Will it add color to my hair and make it darker? I used the shampoo religiously for over a year, but didn’t notice my hair changing color at all. What was up with the promise of black hair?
It turns out that what the copy is referring to is the philosophy of scalp and hair care in Korea that emphasizes scalp health as a means of keeping hair youthful looking.
Korean hair experts tell us that scalps kept free of oil, product build-up, and dead skin actually produce more hair—hair that is more likely to stay its original color and texture rather than turning gray, white, or frizzy. This means that the key to youthful-looking hair and fewer grays is actually based on the scalp! This is absolutely revelatory to me, since I just assumed that the look of my hair would age over time unless I used a lot of chemical treatments on it.
But how to make a healthy scalp? I mean, my scalp, like my skin, is naturally oily and I live in a pretty disgusting city (New York). The answer is “scalp scalers” or “scalp shampoos.” These products remove oil, pollution, and dead skin build-up to reveal healthier scalp skin. They keep hair follicles healthy and unobstructed so they can release lots and lots of my (sigh) naturally ash brown hair.
Focus these products on the scalp, not the hair as you would with a typical shampoo. The main difference between scaler and scalp shampoo is that scalp shampoo bubbles while scaler is a liquid that doesn’t lather when you rub into your scalp. No matter which you use, rinse after letting it sit on your scalp for three to five minutes.
Once per week I sit in front of my makeup mirror and section my hair as if I’m coloring the roots. I use one of the million micro mists I own to wet the part, apply a small amount of scalp shampoo right down the part, and then gently use my fingers to work it directly into my scalp. I’m very careful about avoiding getting the scalp shampoo all over my hair, which leaves strands feeling stripped.
After applying the shampoo from the front to the back of my head (because the front-top of one’s head works as the scalp’s trash bin, according to Get It Beauty) I hop in the shower and carefully rinse the scalp shampoo from my hair.
Since starting to do this my scalp feels better and actually looks better. Yes, I study the state of my scalp, haha.
Shampoo

A sample-size bottle of my favorite shampoo, Skylake Herbal Cool Shampoo, complete with the floating root.
Next, it’s time to focus on the hair. I apply my favorite Korean shampoo for this luxury routine, Skylake Herbal Cool Shampoo, all over my hair and scalp before rinsing it.
The shampoo has a neutral pH of 7 and I think it’s one of the best values in Korean beauty. It’s not a watery product at all, but a thick, herb-rich sap that feels incredible on my scalp and strands. There’s even a chunk of root floating in the bottle, in line with the other beauty products that feature “real” ingredients (like grains and leaves and pieces of fruit) on the rise in Korea now! It was this product that made me a K-beauty hair care believer more than a year ago.
Vinegar Rinse (no, seriously)
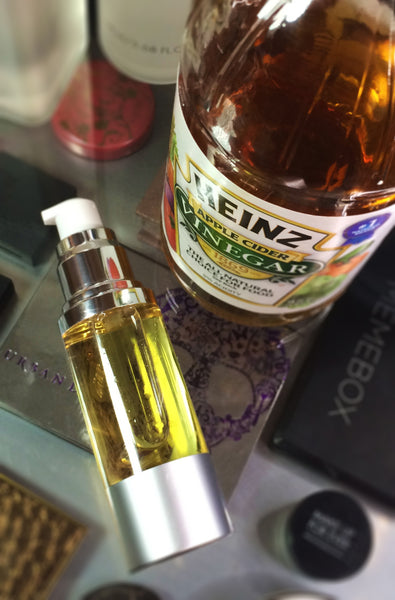
Here’s where things get retro. My great grandmother, when she was growing up, used to get her hair rinsed once per week by her mother with a vinegar solution. This was apparently done for the sake of shine, but I always assumed that it was one of those things people did in the past just because they had always done things that way and didn’t have a lot of the fancy resources we have today. Kind of like living without refrigeration (and we know what a difference that makes).
Sometimes the elders really do know best. After learning that your scalp and hair are weakly acidic and that hair is strongest and healthiest when treated with lower-pH products, I whipped up my own vinegar rinse and applied it.
I took a 50% apple cider vinegar solution (it smells better to me than distilled vinegar) and 50% water solution and put it in an airless pump bottle. I apply the solution after using shampoo and before conditioner (so my hair has more chances for the vinegar to rinse out). I focus on the length of my hair as opposed to the roots, but it feels very cooling and pleasant on my scalp too. After a few minutes of soaking I start rinsing this out of my hair. It takes a good deal of rinsing (I use lukewarm water—cold is best, but I’m not a masochist) to get it out, but the impact on my hair’s shine is amazing. Great-great grandma was really on to something!
Hair treatment
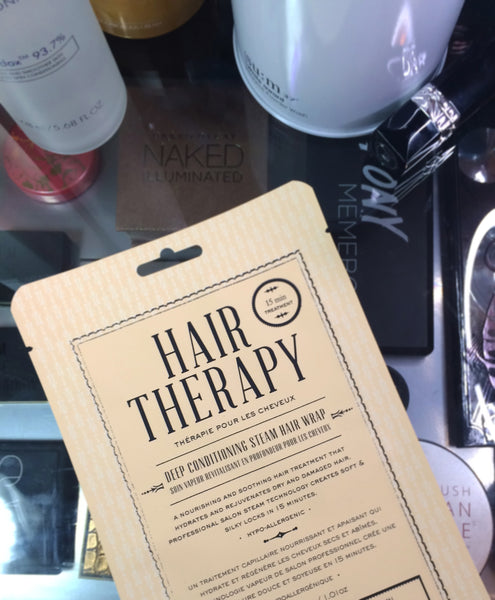
Kocostar Hair Therapy
After getting as much vinegar out of my hair as humanly possible, I apply a hair treatment.
Note that if you want a K-beauty conditioner to moisturize and nourish your hair and improve its look, you’ll most likely need to look for it under the name “rinse” or “treatment.” Very few products are actually called “conditioners.”
Since I’m going for all out pampering, I experimented this week with a steam pack—Kocostar Hair Therapy, a deep conditioning steam wrap. I saw these on Get It Beauty and went wild—it’s like a hair-shaped plastic bag pre-filled with hair treatment that you seal around your hair with the help of a sticker ! I love this concept. Heat and time really do seem to help my hair a lot, but I’ve always avoided doing it because I don’t always have a shower cap handy and don’t want to scrub the treatment out of the cap once I’ve used it.
Now, if you want to be really hardcore and correct, you could do the vinegar rinse after the hair treatment, since the acidity closes the hair shaft, making it harder for the treatment to penetrate. I’m all about the big picture, so I like to put on treatments post-vinegar to give my hair more chances to get the vinegar out and get the treatment fragrance on more strongly just in case I missed some of the vinegar.
To use this treatment steam pack on my long hair, I take my towel-dried hair and wrap it into a loose bun, slip the plastic steam pack on my head, focusing on getting a good fit, and then seal the bag with the sticker at the top of my forehead. I then use my fingers to squish my bun loose through the bag and distributed the treatment.
Last time as I was doing this, I relaxed in my robe with a Banila Co. lace mask and did some online shopping while enjoying a cold drink—why not go 100% spa experience? Once 20 minutes had passed I removed the mask and steam pack and rinsed the treatment from my hair.
My hair felt great—not overly conditioned, but strong and healthy, which is a big deal considering that my ends were dyed platinum blonde repeatedly in the past!
Brush
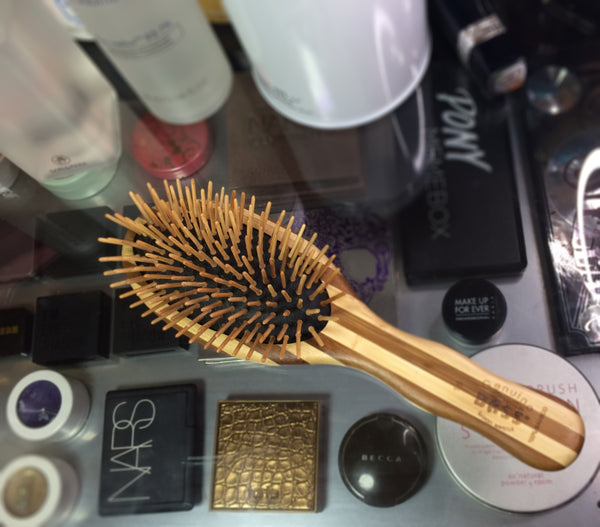
My favorite bamboo bristle cushion brush that can even be trusted near wet hair.
I towel my hair dry again and then brush it starting at the bottom and working to the top with the help of an amazing, gentle brush: the Oval Wood Bristle Brush from Bass. The bristles don’t pull or snag my hair and the bamboo actually feels nice when it comes into contact with my scalp. I know that rhapsodizing about a brush probably seems strange, but it’s just really pleasant to use!
Leave-In Fluid

Skinfood Avocado Leave-In Fluid
Next I apply Skinfood’s Avocado Leave-In Fluid, which contains avocado oil to help hair feel softer. I’ve tested this leave-in fluid and the next step (hair essence) alone and together, and what I found is that this creamy fluid is the thing that makes my hair stupidly soft. I find that when I use this I can’t stop touching my hair because it feels like a mane worthy of a hair product commercial.
The way I use this is by squirting a few pumps of the fluid into my palms, warming it, and then running my hands through my hair, avoiding the scalp and roots. This distributes the fluid to my strands while letting my oily scalp be.
Hair Essence
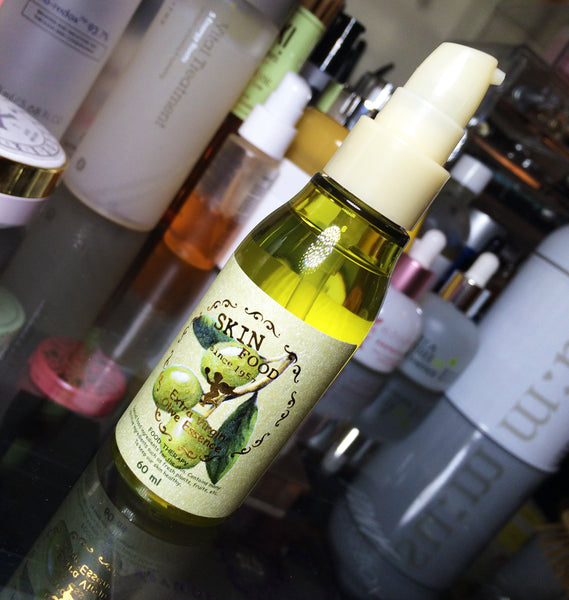
Skinfood Extra Virgin Olive Essence
I follow the leave-in fluid with hair essence: Skinfood’s Extra Virgin Olive Essence, which contains olive oil to impart shine. If the Avocado Leave-In Fluid is for softness, this is the part of the puzzle that transforms my battered hair into something silky and shiny (keep in mind that I haven’t bothered to get a haircut since December, so any hair prettiness is all on account of products I use at home).
To use this I just pump a bit into my palms (less is more when it comes to hair essences) before grabbing the ends of my hair to work the product through, thoroughly rubbing any last bit of it just above the ends. I twist my hair into about three sections to help evenly distribute the essence and let this sit for about five minutes so it makes friends with my hair. The goal is to have my hair stay in place better when I start to style it. If I have time, I’ll just air-dry my hair. If I’m in a rush or need to get a good curl before an event I blow-dry my hair gently using medium heat.
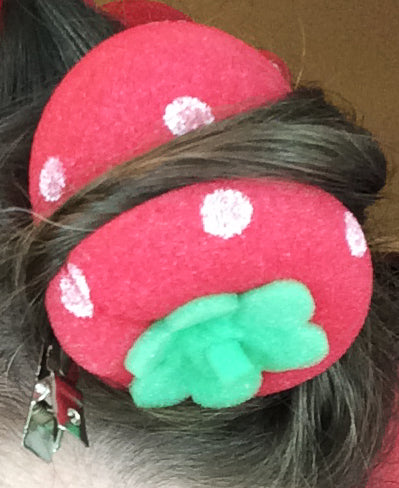
Curling

Here’s my hair all rolled up. After more experimentation it turns out that these work fabulously!
True story: for a long time I thought that the Etude House Strawberry Sponge Hair Rollers would never work for my super thick hair—if I wrapped more than just a bit of hair in them they would unroll quickly. I even threw one set out due to my kitten deciding that they were his favorite snack; I didn’t want the poor beast requiring a stomach pump of strawberry foam just because I’m disorganized and he loves danger.
Unless you have superfine hair, the trick is to pin the rollers just like any other styling roller. What I like about them is that they’re foam, so there aren’t hard lines or kinks in the curls, which can sometimes happen with plastic rollers.
The necessary dryness level of your hair prior to rolling depends on how much time you have to sit around in curlers and how tight you need the curls to be. The general rule is that the shorter the time you’re wearing the rollers, the drier your hair needs to be, assuming you’re not adding heat from a blow dryer to your rollers.
If you have just 30 minutes for curling, make sure your hair is being rolled warm and dry because there’s no way any water can evaporate from within the roller in that amount of time. If you have a few hours to give, you’ll be able to get a tighter, longer lasting curl, but you still need to roll up hair with just a hint of dampness. The variable that can throw everything off is the weather: The more humid the day, the drier your hair needs to be before it’s rolled and the more likely your curl will spectacularly collapse.
Here’s my hair in strawberry rollers along with some of the gray hairs caused by freaking out over new K-beauty releases. That’s a joke—it’s actually the aging of the scalp that causes gray hair, not shock!
And here’s a closer look at a roller and the curler clip that keeps the curl tight.
Curler clips are the heroes of this hairstyle.
With the help of a curler clip the strawberry rollers actually become legit styling tools even for my mega thick hair. It took 10 berries to get my hair all into rollers for a retro loose curl look.

My finished mane.
Even if I rush my weekday hair care, this weekend routine makes sure that I start the week with a pampered scalp and shiny strands.
—Tracy
Tracy, better known as fanserviced, is a professor-turned-K-pop and K-beauty fangirl trying to balance her need for great skin care with her love for fabulous and fantastical makeup. Get @fanserviced on Instagram.